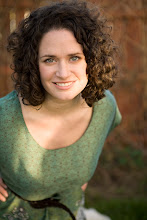
A project I've been working on is finally up on youtube! Basically, I kept thinking of all these things I wanted to show my family and friends who live far away, but of course it's hard for them to come out here. So I created My LA, a travel show. I also wanted to work on my hosting skills, so it made sense to just get out there with my handicam and do it! I had some help; this first episode features my good friend Cole Matson who was visiting me at the time (and is working on his PhD in Theology and Theater at St. Andrews...he does lectures all the time about CS Lewis, and has an interesting blog.), and I had a ton of audio help in the voice overs from Danny Fasold, who was also generous enough to let me use the music from his band, In Fades. Please give them some love if you like what you hear!
I had to do a lot of chopping for this to look decent, and I've been learning a lot along the way about filming and editing! You heard it here, kids! The best way to learn about filming is to do it! (Yes, I would greatly benefit from producers and directors and editors who actually know what they're doing. This was kind of hard, and needs a lot more work.)
Anyway, here's the finished product!
The hope here is to do weekly episodes. Part 2 should be up this Friday (hopefully) and I'm working on my script and voice over for the next one. Suggestions for places to go are greatly appreciated! I'm planning on doing mostly stuff that is interesting to locals, but include some of the more touristy stuff too.
Wednesday, July 31, 2013

Saturday, July 27, 2013
Eco-cast Madness!!
So, I had to do an eco-cast audition. Basically what that means is you take a video of yourself, upload it to a website, instead of going to an audition in person. This has a lot of advantages; the actor doesn't have to spend the gas or time on the road going to an audition, they can upload only their best takes, and the casting director saves time and money by not renting a space and having to wait around for flaky actors when they could be doing other, more interesting and important things. So, win-win. In theory.
I am, happily, in possession of a handi-cam, so I didn't have to record from my webcam, which the eco-cast site expressly tells you not to do. I recorded it, did several takes, and went to download it onto my computer. But alas! I didn't have enough space! "Not to worry," I thought (I think in a 1930s British accent), "I can put it on my external hard drive, there is plenty of room there!" I plugged it in, and...nothing. The computer didn't recognize it as a valid USB device. Fail. So I tried to move some stuff around, get more space on my computer. Still not enough. And yes, it works just fine on other computers. Fast forward a couple days, to today, when it's due. Out of sheer frustration I plugged the hard drive in again, and eureka! It worked! I downloaded the video, cut it up in Windows Movie Maker to look decent, and went to upload it onto the eco-cast site.
It was too late. The file was due by noon.
Womp-womp.
Directors, not everybody has access to a RED camera or some other fabulous technology, or FinalCut Pro, or AfterEffects. We don't all have reliable computers that are awesome and always work. We tend to spend any extra money we have on headshots, classes, and gas. So maybe give us the option to either do an eco-cast audition, OR come audition in person. I know, this is a scary concept, but you may actually get better results...on BOTH fronts.
Meanwhile, I'm going to tell myself not to be disappointed, be glad my hard drive is working now, and that it obviously wasn't meant to be. I'd probably be terribly unhappy even if I had gotten the part, right? Maybe the director isn't very nice, or they don't have the budget to do what they want and it's going to turn out terrible. These are the things I tell myself.
And now I can move on to the next thing.
I am, happily, in possession of a handi-cam, so I didn't have to record from my webcam, which the eco-cast site expressly tells you not to do. I recorded it, did several takes, and went to download it onto my computer. But alas! I didn't have enough space! "Not to worry," I thought (I think in a 1930s British accent), "I can put it on my external hard drive, there is plenty of room there!" I plugged it in, and...nothing. The computer didn't recognize it as a valid USB device. Fail. So I tried to move some stuff around, get more space on my computer. Still not enough. And yes, it works just fine on other computers. Fast forward a couple days, to today, when it's due. Out of sheer frustration I plugged the hard drive in again, and eureka! It worked! I downloaded the video, cut it up in Windows Movie Maker to look decent, and went to upload it onto the eco-cast site.
It was too late. The file was due by noon.
Womp-womp.
Directors, not everybody has access to a RED camera or some other fabulous technology, or FinalCut Pro, or AfterEffects. We don't all have reliable computers that are awesome and always work. We tend to spend any extra money we have on headshots, classes, and gas. So maybe give us the option to either do an eco-cast audition, OR come audition in person. I know, this is a scary concept, but you may actually get better results...on BOTH fronts.
Meanwhile, I'm going to tell myself not to be disappointed, be glad my hard drive is working now, and that it obviously wasn't meant to be. I'd probably be terribly unhappy even if I had gotten the part, right? Maybe the director isn't very nice, or they don't have the budget to do what they want and it's going to turn out terrible. These are the things I tell myself.
And now I can move on to the next thing.
Tuesday, July 23, 2013
Pen Holder
Well, I made another craft! This time it's a pen holder. I was inspired by this one:
 And I thought...I can make that! So I did! It was pretty easy too. If you're like me, you have a bunch of maps in your car that have been rendered obsolete since you got a GPS/Smartphone. If you are even more like me, you live in a city far away from your hometown, your family, and everything familiar. So I chose an old map I had of DC. I never drive in DC anyway, the Metro is pretty awesome so I don't need to, and people drive even worse there than here in LA! I used toilet paper tubes as well, for the shape.
Materials needed: 6 Toilet paper tubes (they tend to just collect, if you don't bother to throw them out when you're done.), glue (I used a glue gun, but I think anything strong will work.), and maps.
Step 1: Measure the tubes. You need the circumference and the length. Then cut up the map in squares that match your measurements, using the circumference as your top length, and the length as the sides. Try to be strategic, so that the map pieces you choose have inspiring or pretty features. I picked mostly bits from the mall and Smithsonian museums. Cut 6 pieces of map to fit the 6 tubes.
Step 2: Glue the map pieces onto the tubes.
Step 3: Glue the tubes together. I did a flower pattern, with one in the middle and the other 5 around it. If you want, cut map or cardboard circles to fit the bottom. Or not, I didn't really bother with it, and as long as you put pens in each tube it won't tip over.
I did mine this way because I had a bunch of different pens I wanted to organize. I used 1 tube for my favorite pens, Pilot Precise Rolling Ball ink pens, 1 tube for highlighters, 1 tube for pencils, 1 tube for sharpies, 1 tube for ball-point pens, and 1 tube for other fancy pens. I just like to be able to reach and grab the pen I want without sifting through them all.
Anyway, this was how mine worked out!

I think it looks neat! ^_^
By the way, if you want something larger, use tin cans like this one! (I made mine like I did because I wanted to organize my pens in a bit more specific compartments. And I had a lot of toilet paper tubes and not a bunch of cans).
 You can see how she did it here!
Materials needed: 6 Toilet paper tubes (they tend to just collect, if you don't bother to throw them out when you're done.), glue (I used a glue gun, but I think anything strong will work.), and maps.
Step 1: Measure the tubes. You need the circumference and the length. Then cut up the map in squares that match your measurements, using the circumference as your top length, and the length as the sides. Try to be strategic, so that the map pieces you choose have inspiring or pretty features. I picked mostly bits from the mall and Smithsonian museums. Cut 6 pieces of map to fit the 6 tubes.
Step 2: Glue the map pieces onto the tubes.
Step 3: Glue the tubes together. I did a flower pattern, with one in the middle and the other 5 around it. If you want, cut map or cardboard circles to fit the bottom. Or not, I didn't really bother with it, and as long as you put pens in each tube it won't tip over.
I did mine this way because I had a bunch of different pens I wanted to organize. I used 1 tube for my favorite pens, Pilot Precise Rolling Ball ink pens, 1 tube for highlighters, 1 tube for pencils, 1 tube for sharpies, 1 tube for ball-point pens, and 1 tube for other fancy pens. I just like to be able to reach and grab the pen I want without sifting through them all.
Anyway, this was how mine worked out!
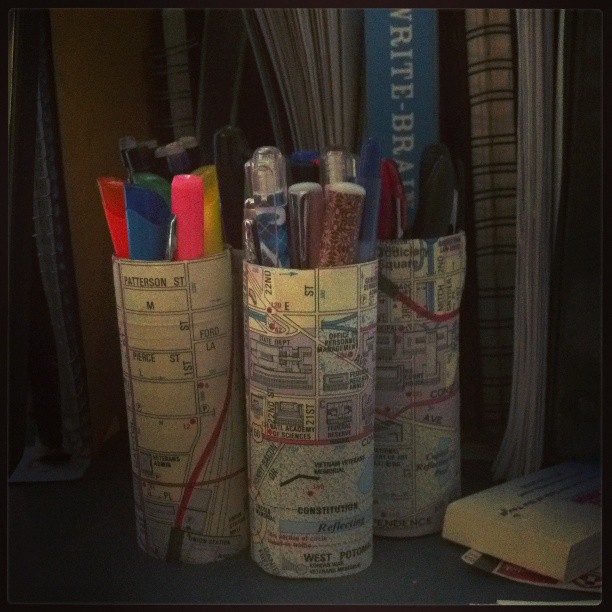
I think it looks neat! ^_^
By the way, if you want something larger, use tin cans like this one! (I made mine like I did because I wanted to organize my pens in a bit more specific compartments. And I had a lot of toilet paper tubes and not a bunch of cans).
Tuesday, June 18, 2013
A Fan Video In The Making
In an effort to stay creative, I've started just doing my own projects. One of these, which I hope to have completed before the end of July, is being loosely called "Sad Robot" or "Lonely Robot."
Here's the back-story: working at Banana Republic, we have a bunch of songs that play all day long. There is a variety of maybe 15 or 20 songs. Sometimes songs are added or detracted, but not often. So I hear the same songs, over and over, every day, all day long. One song that stuck out to me in particular was "I Am Not a Robot" by Marina and the Diamonds. As I listened, a narrative began to develop in my head. When I saw the video, however, I was a little disappointed. There were no robots! Certainly it was my duty to amend this. And so, I'm attempting to create a "fan video" in which I overlay her audio over my video, and pray that I don't get sued. I may send a fruit basket or something preemptively.
I have planned and plotted, and even made a storyboard! Check out a piece of it:

Rudimentary, I know, but it gets the point across to me, which is what matters. I also kind of think this particular shot is hilarious the way I drew it!
Anyway, I'm now working on building the robot costume. Once that is finished, I will start looking around for cast and crew. I don't want to commit people until I know I can set a shoot date. I have a couple of people already who have volunteered time and resources, so I think things will go along pretty smoothly. I need a few more people, mostly kids and guys to play mad scientists, an editor, some locations, a van, and the completed costume. The editor will probably be the most important, since I want to add visual effects and go in and out of slow-mo.
Here's where the robot is so far:
I pretty much gutted a couple of telephones. I'll be adding some more stuff, I found a lot of it through freecycle and people who were just super duper generous!
Hopefully I'll have everything put together soon!
Here's the back-story: working at Banana Republic, we have a bunch of songs that play all day long. There is a variety of maybe 15 or 20 songs. Sometimes songs are added or detracted, but not often. So I hear the same songs, over and over, every day, all day long. One song that stuck out to me in particular was "I Am Not a Robot" by Marina and the Diamonds. As I listened, a narrative began to develop in my head. When I saw the video, however, I was a little disappointed. There were no robots! Certainly it was my duty to amend this. And so, I'm attempting to create a "fan video" in which I overlay her audio over my video, and pray that I don't get sued. I may send a fruit basket or something preemptively.
I have planned and plotted, and even made a storyboard! Check out a piece of it:

Rudimentary, I know, but it gets the point across to me, which is what matters. I also kind of think this particular shot is hilarious the way I drew it!
Anyway, I'm now working on building the robot costume. Once that is finished, I will start looking around for cast and crew. I don't want to commit people until I know I can set a shoot date. I have a couple of people already who have volunteered time and resources, so I think things will go along pretty smoothly. I need a few more people, mostly kids and guys to play mad scientists, an editor, some locations, a van, and the completed costume. The editor will probably be the most important, since I want to add visual effects and go in and out of slow-mo.
Here's where the robot is so far:
 |
| Doesn't it look like it does something? Cool, huh? |
I pretty much gutted a couple of telephones. I'll be adding some more stuff, I found a lot of it through freecycle and people who were just super duper generous!
 |
| I like to lay out the stuff I have, I find it helps inspire. |
Hopefully I'll have everything put together soon!
Tuesday, June 11, 2013
The Weirdest Audition Ever
I would like to share probably the weirdest audition I ever went to. It's been long enough now, I don't think I got cast, and they haven't really reached out to me at all, so I don't think I'll burn any bridges. I won't name names, but I will be very specific about the events, it will be hard for someone involved not to know what I'm talking about. Anyway, disclaimer over.
First of all, when I was asked to come in, they sent me a script. I had an idea of what scenes they would want me to prepare, since it wasn't very long, but nevertheless they didn't tell me specifically. From the beginning I was a little worried, there were some strange turns of phrase that made me think it was written by someone for whom English was not their first language. That's not really a bad thing, but if you're trying to write a script, and it's supposed to be about Americans, and you aren't strong in the dialect, hire an editor to look it over and polish it.
I showed up on time, but they were running behind; it looked like they were taking about 15 minutes or so with each person, which is kind of a lot for what they were doing. While I was waiting, I noticed another audition at the same location that didn't have anyone waiting. Another actress and I asked the director about the project, and asked if we could read in, since no one else was there. She said yes, and we did, and I thought it was really cool. Lesson: if the circumstances are right, take the opportunity to crash an audition. Be careful though, these opportunities are very rare, and sometimes it can be very annoying to the casting director.
I finally got into the room of the project I was originally there for, and they asked me what I thought of the project, and we discussed it a little bit. I was right about my assumptions about language, but it didn't affect my interview or ability to understand him. I thought. I asked him about the ending, which I found confusing, and he said it was supposed to be, and basically that was it. I read the scene, which involved sitting in a "Casting Director's" (agent's?) office looking for work, having to choke down annoyance at their attitude (not an uncommon experience in real life), and put on a professional face. In the scene the "casting director" immediately sends my character (who has just arrived in LA) on a job for a PSA, that "only pays five thousands." I wish it was that easy! Oh, and even with that paycheck she can't make rent.
Anyway, the point of the scene was to find the subtle difference between being completely gobsmacked at the other person's condescending attitude, and putting on a patient and professional front. I thought I had achieved this in my reading, but the director didn't think so, so I asked him if I should make it more obvious, and he said no. Let me rephrase...he told me I needed to play that conflicting duality, but not to play it. I'm not sure what he was getting at. I read it again, really gritting my teeth when I needed to, because I felt a pretty strong connection to what the character was going through at the time.
After my performance, the director asked a series of questions. They were completely random. They didn't seem so at first, what actors I like, if I like New York or LA better, but then what kind of car I drive, what kind of toothpaste I use...I really don't know why he needed to ask any of that, and he never told me. It was all very mysterious, like some sort of test.
What I should have said was, "why are you asking me these questions? What is their purpose? Why didn't you have someone edit your script so that the language barrier was less obvious? Why do you think casting directors send people out on jobs like that? Why do you have a direction in which the casting director "leafs through the pages of her resume?" Look at the headshots in front of you, that's what we use for agents and casting directors too. Why does the main character practice Chekhov in a mirror? How exactly do you plan on staging an "acting battle" at the end? Is it going to be like that scene in American Dad where Stan and Roger act at each other on stage? Do you realize how ridiculous that is?"
I'm glad they didn't call me back. From what I could tell of the script and meeting the director (who needs to try wearing deodorant if they're going to sit in a tiny stuffy room with bad ventilation all day), it would not be a project I would want to be involved in.
First of all, when I was asked to come in, they sent me a script. I had an idea of what scenes they would want me to prepare, since it wasn't very long, but nevertheless they didn't tell me specifically. From the beginning I was a little worried, there were some strange turns of phrase that made me think it was written by someone for whom English was not their first language. That's not really a bad thing, but if you're trying to write a script, and it's supposed to be about Americans, and you aren't strong in the dialect, hire an editor to look it over and polish it.
I showed up on time, but they were running behind; it looked like they were taking about 15 minutes or so with each person, which is kind of a lot for what they were doing. While I was waiting, I noticed another audition at the same location that didn't have anyone waiting. Another actress and I asked the director about the project, and asked if we could read in, since no one else was there. She said yes, and we did, and I thought it was really cool. Lesson: if the circumstances are right, take the opportunity to crash an audition. Be careful though, these opportunities are very rare, and sometimes it can be very annoying to the casting director.
I finally got into the room of the project I was originally there for, and they asked me what I thought of the project, and we discussed it a little bit. I was right about my assumptions about language, but it didn't affect my interview or ability to understand him. I thought. I asked him about the ending, which I found confusing, and he said it was supposed to be, and basically that was it. I read the scene, which involved sitting in a "Casting Director's" (agent's?) office looking for work, having to choke down annoyance at their attitude (not an uncommon experience in real life), and put on a professional face. In the scene the "casting director" immediately sends my character (who has just arrived in LA) on a job for a PSA, that "only pays five thousands." I wish it was that easy! Oh, and even with that paycheck she can't make rent.
Anyway, the point of the scene was to find the subtle difference between being completely gobsmacked at the other person's condescending attitude, and putting on a patient and professional front. I thought I had achieved this in my reading, but the director didn't think so, so I asked him if I should make it more obvious, and he said no. Let me rephrase...he told me I needed to play that conflicting duality, but not to play it. I'm not sure what he was getting at. I read it again, really gritting my teeth when I needed to, because I felt a pretty strong connection to what the character was going through at the time.
After my performance, the director asked a series of questions. They were completely random. They didn't seem so at first, what actors I like, if I like New York or LA better, but then what kind of car I drive, what kind of toothpaste I use...I really don't know why he needed to ask any of that, and he never told me. It was all very mysterious, like some sort of test.
What I should have said was, "why are you asking me these questions? What is their purpose? Why didn't you have someone edit your script so that the language barrier was less obvious? Why do you think casting directors send people out on jobs like that? Why do you have a direction in which the casting director "leafs through the pages of her resume?" Look at the headshots in front of you, that's what we use for agents and casting directors too. Why does the main character practice Chekhov in a mirror? How exactly do you plan on staging an "acting battle" at the end? Is it going to be like that scene in American Dad where Stan and Roger act at each other on stage? Do you realize how ridiculous that is?"
I'm glad they didn't call me back. From what I could tell of the script and meeting the director (who needs to try wearing deodorant if they're going to sit in a tiny stuffy room with bad ventilation all day), it would not be a project I would want to be involved in.
Tuesday, March 19, 2013
I Didn't Get The Part! (Why That's OK)
So last night I had a really great audition. It was intense, I felt goosebumps, and I'm pretty sure the director and casting director did too. It was for a student project, a scene study from the movie Closer (which is a pretty twisted, though well-written film), in which the director was actually using the original play script. It went so well, in fact, they asked me then and there to stick around and do a call-back that night, with an actor they liked for the opposite role, to get a chemistry read. While I was waiting around, they even dismissed one of the other girls they called back! Plus, I got a chance to chat with the guy I would be reading with. I had everything going for me!
I didn't get the part. They said I would know last night, and I haven't heard from them. But let's break this down as to why this isn't anything to cry about.
1. I loved my read. I felt like I got everything pretty much right, I was thinking character thoughts, and I was focused, something I have been working super hard on. I used a lot of the tools for auditions and scene work that I had been taught from my amazing teacher Joel Asher when I studied with him last year. I was making strong choices, and had a clear arc.
2. The director loved my read. At least, he said so. He loved it enough to want to test me with the other actor. He gave me good direction, and I felt like I made good adjustments.
3. Not getting the part pretty much means the other girl just had better chemistry with the other actor. That's a really tricky thing to try and manufacture, and is very much out of my control.
So what do I take away from all of this? I'm a good actor. There is nothing inherently wrong with my technique or my brand. And frankly, in this business, that can be an important thing to remind ourselves of. As actors we face rejection constantly, and we need to let ourselves find the victories where we can. Yes, it would have been great footage for my reel, but there will be other projects, and I can take the lessons I learned in this audition with me to the next one.
I didn't get the part. They said I would know last night, and I haven't heard from them. But let's break this down as to why this isn't anything to cry about.
1. I loved my read. I felt like I got everything pretty much right, I was thinking character thoughts, and I was focused, something I have been working super hard on. I used a lot of the tools for auditions and scene work that I had been taught from my amazing teacher Joel Asher when I studied with him last year. I was making strong choices, and had a clear arc.
2. The director loved my read. At least, he said so. He loved it enough to want to test me with the other actor. He gave me good direction, and I felt like I made good adjustments.
3. Not getting the part pretty much means the other girl just had better chemistry with the other actor. That's a really tricky thing to try and manufacture, and is very much out of my control.
So what do I take away from all of this? I'm a good actor. There is nothing inherently wrong with my technique or my brand. And frankly, in this business, that can be an important thing to remind ourselves of. As actors we face rejection constantly, and we need to let ourselves find the victories where we can. Yes, it would have been great footage for my reel, but there will be other projects, and I can take the lessons I learned in this audition with me to the next one.
Sunday, March 3, 2013
DIY Organizing: Magazine Holders
I have been on a bit of a kick lately, organizing all my stuff, cleaning things out, getting rid of junk and clothes I don't use, I was looking for a way to organize some of the notebooks and binders and headshots I have piled around my desk. I decided to use magazine racks. Books and notebooks will stand up, easy to see and grab, and I won't need bookends or worry about things falling over or messy piles. The only problem, of course, is I really don't have a lot of money to spare. What with going on my honeymoon, traveling, etc, I have missed some work, and of course I'm not getting paid for acting (yet.) so I needed a solution that cost nothing. Luckily for me, I'm also super into crafts and sewing, so I had a ton of materials lying around the house!
If you're like me, and the Christmas/winter holidays littered your house with amazon boxes, you're already well on your way to making some easy magazine holders. You might also have an iron, some fabric, hot glue or craft glue, a sharpie, duct tape, measuring tape/ruler, and scissors. It also helps to have some kind of straight edge.

First, I took a medium-large box and laid it out completely. I cut off as much tape as possible, and tried to get the whole thing flat. Then, I measured out the basic dimensions. Most paper is 8.5x11 inches in the US, so I made the long sides 9 inches wide, created a spine between them 2 inches wide, and below one of the long sides I cut a bottom that was 2.5 inches wide, so I would have a little lip to secure to the side and hold the shape. I experimented with two dimensions, one with a 2 inch spine and one with a 3 inch spine. The larger one was a little more stable standing, and better for binders and such. Most boxes have a lot of natural creases built in, so I used these as a guide. That was very helpful, and I ended up going with the natural height of the box, which was something like 11.5 inches. I then used closed scissors and scored along the places where it would bend. I marked the lines in black sharpie here. This is a very useful tool, and helps keep your scoring straight.
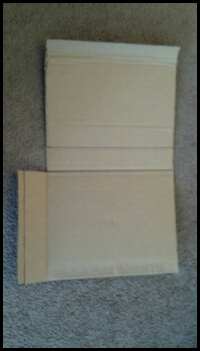 Next, I cut the slanty parts. I went 4 inches from the base, and 4 inches from the spine, made a dot at each point, connected the dots with a straight edge, and cut along the line. Fairly simple. This gives the basic shape you want in a magazine holder, so you can see the corners of the books. Hopefully, you can start to see this taking shape.

 My pattern happened to land on a spot where the box was meant to bend, but I didn't want my holder to bend there. Obviously, depending on the size of box your using, this is inevitable. So I reinforced the crease with duct tape so it wouldn't be weak there. It doesn't really force it stiff, but makes it less likely to tear. This is also important if in the course of making the pattern you find (or make) a small tear. It's important to reinforce these things for structural integrity.

I made sure to iron my fabric cover (that's what the iron was for), and laid it out under the pattern, wrong side up. There are a couple ways to do this, depending on your skill, scissor sharpness, and general coordination. I found it most effective after a bit of trial and error to place the pattern on the fabric, leaving generous room for seam allowance, and used hot glue to make a line around the outer edge of the pattern and stick it to the fabric. This is kind of hard, and if you are using hot glue, you need to do one line at a time and stick it to each one before the glue cools. You can put glue all over the surface that's being covered, but with hot glue that kind of sticks up and if your fabric is thin, might be obvious on the finished product.

After the fabric is more or less secure, cut around the shape, again, leaving a bit of seam allowance. I left about an inch all around. you will have to cut a diagonal line where the bottom piece meets the spine in order to get the fabric to lay right. Then glue the fabric carefully onto the inner edges of the pattern. I was worried at first that I might have to allow for folding, but with the fabric I used it didn't make a difference. I just glued everything straight on, and when I folded it up it didn't really stretch or pull. Try to make sure there aren't bits of the corner folds sticking up by putting some glue between the folds.

Now it's time to put it together! Basically, it all kind of just happens intuitively, but fold up the bottom flap to a 90 degree angle, fold that last half-inch bit another 90 degrees, put a line of glue on the outside of that half-inch bit, and fold the spine and the other side up and over, so that the inside of the other long side glues flush with the bottom.

Obviously, you can decorate it any way you like. I decided to keep it fairly simple, and just add a ribbon around the bottom. Simply cut to the desired length, and glue on. You could go in any direction with this though, in fact if you have cool wrapping paper instead of fabric, that's probably a great option for your base cover. You could add beads, glitter, ribbons, decoupage, whatever. Make it a theme. Make it a mess. It's your thing, that's kind of the point!

And Voila! There's your magazine holder! Simple, takes about 10 minutes per piece depending on your level of skill. I'm sure there are more sophisticated ways to do this, but this was what I came up with in a pinch.

I'm kind of proud of it, since I just sort of did it without any tutorials. Some of the commercially sold ones also have a piece on the front, making it more of a closed box. I think that would be really easy to add, just cut a piece about 4 inches long (whatever the height of the straight edge in front) and an inch wider than the spine. Score and fold a half-inch on each side, cover with your fabric or whatever, and glue it in, using the half-inch tabs to attach to the inside of the front. We'll see how these stand up to the test of time, but I think they're pretty snazzy on my desk, holding my notebooks! (which, it turns out, are too wide to allow me put a front piece on. Oh well. I might do it for the one with my headshots.)
If you're like me, and the Christmas/winter holidays littered your house with amazon boxes, you're already well on your way to making some easy magazine holders. You might also have an iron, some fabric, hot glue or craft glue, a sharpie, duct tape, measuring tape/ruler, and scissors. It also helps to have some kind of straight edge.
First, I took a medium-large box and laid it out completely. I cut off as much tape as possible, and tried to get the whole thing flat. Then, I measured out the basic dimensions. Most paper is 8.5x11 inches in the US, so I made the long sides 9 inches wide, created a spine between them 2 inches wide, and below one of the long sides I cut a bottom that was 2.5 inches wide, so I would have a little lip to secure to the side and hold the shape. I experimented with two dimensions, one with a 2 inch spine and one with a 3 inch spine. The larger one was a little more stable standing, and better for binders and such. Most boxes have a lot of natural creases built in, so I used these as a guide. That was very helpful, and I ended up going with the natural height of the box, which was something like 11.5 inches. I then used closed scissors and scored along the places where it would bend. I marked the lines in black sharpie here. This is a very useful tool, and helps keep your scoring straight.
I made sure to iron my fabric cover (that's what the iron was for), and laid it out under the pattern, wrong side up. There are a couple ways to do this, depending on your skill, scissor sharpness, and general coordination. I found it most effective after a bit of trial and error to place the pattern on the fabric, leaving generous room for seam allowance, and used hot glue to make a line around the outer edge of the pattern and stick it to the fabric. This is kind of hard, and if you are using hot glue, you need to do one line at a time and stick it to each one before the glue cools. You can put glue all over the surface that's being covered, but with hot glue that kind of sticks up and if your fabric is thin, might be obvious on the finished product.
After the fabric is more or less secure, cut around the shape, again, leaving a bit of seam allowance. I left about an inch all around. you will have to cut a diagonal line where the bottom piece meets the spine in order to get the fabric to lay right. Then glue the fabric carefully onto the inner edges of the pattern. I was worried at first that I might have to allow for folding, but with the fabric I used it didn't make a difference. I just glued everything straight on, and when I folded it up it didn't really stretch or pull. Try to make sure there aren't bits of the corner folds sticking up by putting some glue between the folds.
Now it's time to put it together! Basically, it all kind of just happens intuitively, but fold up the bottom flap to a 90 degree angle, fold that last half-inch bit another 90 degrees, put a line of glue on the outside of that half-inch bit, and fold the spine and the other side up and over, so that the inside of the other long side glues flush with the bottom.
Obviously, you can decorate it any way you like. I decided to keep it fairly simple, and just add a ribbon around the bottom. Simply cut to the desired length, and glue on. You could go in any direction with this though, in fact if you have cool wrapping paper instead of fabric, that's probably a great option for your base cover. You could add beads, glitter, ribbons, decoupage, whatever. Make it a theme. Make it a mess. It's your thing, that's kind of the point!
And Voila! There's your magazine holder! Simple, takes about 10 minutes per piece depending on your level of skill. I'm sure there are more sophisticated ways to do this, but this was what I came up with in a pinch.
I'm kind of proud of it, since I just sort of did it without any tutorials. Some of the commercially sold ones also have a piece on the front, making it more of a closed box. I think that would be really easy to add, just cut a piece about 4 inches long (whatever the height of the straight edge in front) and an inch wider than the spine. Score and fold a half-inch on each side, cover with your fabric or whatever, and glue it in, using the half-inch tabs to attach to the inside of the front. We'll see how these stand up to the test of time, but I think they're pretty snazzy on my desk, holding my notebooks! (which, it turns out, are too wide to allow me put a front piece on. Oh well. I might do it for the one with my headshots.)
Subscribe to:
Posts (Atom)